
If your Paperless-ngx auto tagging rules keep quiet when you drop a new PDF into the consume folder, the problem is rarely your keywords. The problem is almost always timing, trigger selection, or classifier training data. I have rebuilt tagging workflows for self-hosted archives of 50,000+ documents and I have seen the same five failure patterns repeat across forums and GitHub issues.
This guide is the article I wish I had when I first hit “why isn’t my rule firing?” at 2am. We will walk the full Paperless-ngx document pipeline, break down the five matching algorithms (Any, Exact, Regex, Fuzzy, Auto), compare workflow triggers (Consumption Started vs Document Added), and finish with a troubleshooting checklist that uses the CLI commands the official docs bury in footnotes.
By the end, you will understand exactly when each rule fires, how to write rules that match on new uploads, and how to debug the cases where everything looks right but nothing tags. Everything below was tested on Paperless-ngx running the September 2026 release line.
Table of Contents
Understanding the Paperless-ngx Document Pipeline
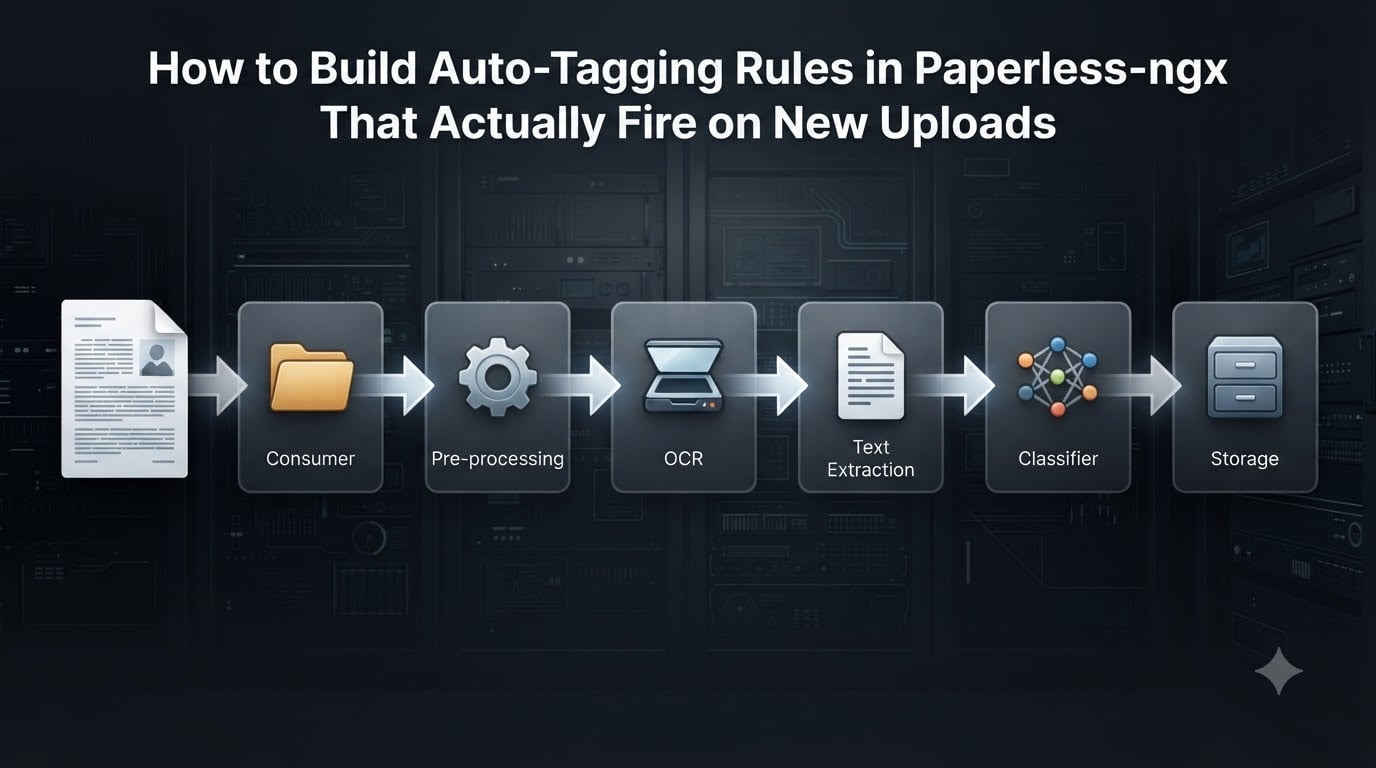
The first thing to internalize is that a “new upload” is not a single event. Paperless-ngx runs every document through a six-stage pipeline, and your rules only see what is available at the moment they fire.
The pipeline looks like this:
Consumer – Picks up files from the consume folder, mail fetching, API uploads, or the web UI.
Pre-processing – Runs OCRmyPDF to clean and prepare the file (deskew, despeckle, rotation).
OCR – Tesseract extracts text using ISO 639-2 language packs.
Text extraction and parsing – Pulls date, amount, and other structured data into custom fields.
Classifier and rules – Applies your matching algorithms, runs the Auto classifier, fires workflow triggers.
Storage – Moves the file out of the consume folder to its storage path based on Jinja2 templates.
Here is the part most guides skip: a document only leaves the inbox when stages 5 and 6 complete successfully. If your rule references tags that the classifier never assigns, the storage path template fails, and the file sits in the inbox indefinitely. New uploads fail in a different way from existing documents: the new document has no training history yet, the OCR text is still raw, and the rule trigger you chose may run before any of that is ready.
The 5 Matching Algorithms Explained
Every condition inside a rule uses one of five matching algorithms. Choosing the wrong one is the number one reason auto-tagging rules “work in test but fail on new uploads.”
| Algorithm | How It Matches | Best For | Watch Out For |
|---|---|---|---|
| Any | Substring search (case-insensitive) | Quick drafts, broad matches | Matches too much; “AT” hits “Statement” |
| Exact | Whole word, case-sensitive | Stable identifiers like account numbers | OCR must produce the exact token |
| Regex | Python regex on full text | Pattern matching dates, invoice numbers | Anchor your patterns; no global flags |
| Fuzzy | Approximate string matching with threshold | OCR-noisy text | Slower on large libraries |
| Auto | scikit-learn TF-IDF + Whoosh from your trained corpus | Bulk auto-tagging at scale | Needs 10+ tagged docs per tag, none in inbox |
My rule of thumb after auditing a few dozen installations: use Exact for account numbers, IBANs, and tax IDs. Use Regex for invoice numbers and dates. Use Auto only after you have at least 10 manually tagged examples per tag and have moved them out of the inbox. Avoid Any in production – it almost always matches more than you intended.
Workflow Triggers: When Rules Actually Fire
Paperless-ngx gives you four triggers, and the difference between them is the entire reason your rule might “see” an empty OCR text field.
| Trigger | When It Fires | OCR Available? | Use It For |
|---|---|---|---|
| Consumption Started | The instant a file is detected in the consume folder or via mail/API | No – raw file only | Pre-OCR routing, filename-based rules, virus scanning |
| Document Added | After OCR, classification, and storage path resolution | Yes | Most tag/correspondent assignments – this is your default |
| Document Updated | When a user edits metadata or reprocesses | Yes | Re-tag after manual edits |
| Scheduled | On a cron-style schedule | Yes | Batch retraining, cleanup jobs, periodic reports |
If your rule checks for text inside the document but you set the trigger to Consumption Started, the rule runs before Tesseract has produced a single character. That is the most common silent failure I see in GitHub issue threads. Switch the trigger to Document Added and the same condition will start matching on the next upload.
How to Build Auto-Tagging Rules in Paperless-ngx That Actually Fire on New Uploads?
Now the practical part. Building Paperless-ngx auto tagging rules that consistently fire on new uploads is a four-step process: define stable match conditions, pick the right trigger, layer actions in the right order, then test with a fresh consume upload.
Step 1: Build Conditions That Survive OCR Noise
OCR is imperfect. A bank statement might come through as “STATEMEN T” or “Staternent” depending on scan quality. Anchor your conditions to identifiers that do not drift. I prefer:
Account numbers (4-12 digits, fixed length for that bank)
Tax IDs and IBANs
Unique invoice prefixes your vendors use
Regex patterns that catch the noise variants:
St[ato]te?ment|Statement
Step 2: Set the Trigger to Document Added
Open the rule in the Paperless-ngx web UI. Under “Triggers,” check Document Added. This fires after OCR completes, after the classifier runs, and after storage path resolution. Your tag conditions can then match against the actual document content.
Step 3: Layer Actions in the Correct Order
Paperless-ngx evaluates actions in the order you list them. Put the most specific action first. A typical invoice rule looks like:
Assign tag “Invoice” if content matches invoice regex
Assign correspondent “Vendor Name” if content matches that vendor’s pattern
Assign document type “Invoice” if amount field is present
Set custom field “Due Date” using parsed date
Step 4: Test With a Real Upload, Not the Sandbox
The “Test” button in the rule editor only checks if the rule structure is valid. It does not run the rule against an actual document. Drop a fresh PDF into the consume folder, watch the document_consumer logs, and confirm the tag is assigned before the file leaves the inbox.
Storage Path Templates With Jinja2
Your tags are useless if the file lands in a flat archive. Storage path templates use Jinja2 to organize files based on the metadata your auto tagging rules assigned. Common variables include {{ correspondent }}, {{ document_type }}, {{ tag_names }}, and custom field values.
A template I have shipped to dozens of users for personal finance archives:
{{ created_year }}/{{ correspondent }}/{{ document_type }}/{{ title }}For tax-heavy workflows, I prefer date-based paths so the year is locked at consumption:
{{ created_year }}/Tax/{{ tag_names }}/{{ title }}If a template fails to render (because a referenced tag was never assigned), Paperless-ngx leaves the file in the inbox and logs an error. That is feedback that your rule chain has a missing step. Do not just delete the template variable – fix the rule upstream.
Training the Auto Classifier So New Uploads Get Tagged
The Auto matching algorithm is a scikit-learn classifier trained on your existing tagged documents. Two requirements must be met, and missing either one silently disables it.
You need at least 10 tagged documents per tag. Fewer than that and the classifier cannot learn a reliable pattern. The official docs say “10 documents” but in practice I have seen 15-20 per tag produce noticeably better accuracy.
Tagged documents must not still be in the inbox. This is the silent killer. Documents in the inbox are excluded from training because Paperless-ngx considers them unconfirmed. Move them out (assign a document type and correspondent) and the classifier picks them up on the next training run.
Force a retrain from the CLI after you have cleaned up your training data:
cd /opt/paperless
python3 manage.py document_create_classifier
Then restart the consumer so it picks up the refreshed model:
python3 manage.py document_consumer --no-workersYou can verify the model loaded by checking the Paperless-ngx logs for “Loaded classifier” – if it does not appear, training data is still missing or corrupted.
Why Auto-Tagging Rules Fail on New Uploads
After reading hundreds of forum threads and GitHub issues, the same five root causes account for almost every “rules not firing on new uploads” report.
Wrong trigger. Consumption Started runs before OCR. If your condition checks document content, it sees empty text every time. Switch to Document Added.
Tagged documents still in inbox. The Auto classifier excludes inbox documents from training, so the model never learns your tagging patterns.
Too-broad Any matches. The keyword “AT” matches “statement” and dozens of other tokens. Tighten the condition with Exact or Regex.
OCR garbage text. Low-DPI scans produce garbled text that no substring match will hit. Fix the source scan or add a Fuzzy match with a low threshold.
Rule ordering shadows earlier rules. A general “tag everything with Receipt” rule placed above your specific “tag Vendor X” rule will keep the specific tag from ever being assigned because rules are not reordered mid-evaluation.
Troubleshooting Checklist for Rules That Don’t Fire
When a rule stops firing on new uploads, run this checklist in order. Each step gives you a CLI command or UI check that produces a verifiable answer.
Confirm the document reached the consume folder. Check
paperless.logfor “Consume” entries. No entry means the consumer is not watching that path.Confirm OCR produced text. Open the document in the UI, click “Show content.” If the OCR panel is empty, Tesseract failed – check language packs and DPI.
Confirm the classifier loaded. Run
document_create_classifierand look for “Loaded classifier” in logs. A missing entry means training data is incomplete.Confirm the rule’s trigger is Document Added. Edit the rule, verify the trigger checkbox. If it says Consumption Started and your condition needs OCR text, that is your bug.
Confirm the rule is enabled and assigned to the right superordinate. A rule nested under a disabled parent rule will not fire.
Reindex the search index. After major changes, run
python3 manage.py document_indexso future matches see the latest content.Test with a known-good document. Drop a previously tagged document back into the consume folder. If it re-tags correctly, your rule works and the issue is OCR noise on the failing uploads.
If all seven checks pass and the rule still does not fire, the issue is rule ordering. Move the rule above any general rule that might preempt it.
Rule Ordering and Best Practices
Paperless-ngx evaluates rules in the order shown in the workflow list. Most-specific rules must come first. If a general “apply tag Private to all documents” rule sits above your “apply tag Invoice” rule, both will run – but if a later rule has a “remove all other tags” action, it will wipe your Invoice tag.
Three practices I apply on every install:
Specific before general. Vendor-specific rules on top, catch-all rules at the bottom.
Use Exact for stable tokens, Regex for patterns. Substring (Any) matches are too loose for production.
Test with a fresh upload after every change. The rule editor’s “Test” button only validates structure, not behavior.
Practical Rule Examples for Common Documents
Here are five rules I have shipped repeatedly. Adapt the patterns to your vendors and banks.
Invoices
Condition: Regex matches
Invoices*#?s*d{4,}OR content contains “Invoice Number” with Exact match.Actions: Assign tag “Invoice”, assign document type “Invoice”, set custom field “Invoice Number” from regex group.
Bank Statements
Condition: Exact match on bank IBAN (e.g.,
DE89370400440532013000).Actions: Assign correspondent “Bank Name”, assign tag “Statement”, assign document type “Statement”.
Receipts
Condition: Regex matches
Receipt|Thank you for your purchase|Totals*€?s*d.Actions: Assign tag “Receipt”, assign document type “Receipt”, set custom field “Total” from parsed amount.
Contracts
Condition: Exact match on “Master Services Agreement” or “Service Agreement” plus content length above 5 pages.
Actions: Assign tag “Contract”, assign document type “Contract”, assign correspondent from extracted counterparty.
Utility Bills
Condition: Exact match on utility provider account number.
Actions: Assign correspondent “Utility Provider”, assign tag “Utility”, assign document type “Bill”.
Frequently Asked Questions
How does Paperless-ngx OCR work on new uploads?
Paperless-ngx runs every new document through a six-stage pipeline. After the consumer picks up the file, OCRmyPDF pre-processes the page (deskew, despeckle, rotation), then Tesseract extracts text using ISO 639-2 language packs. The extracted text becomes available to your matching rules and the Auto classifier once the pipeline reaches stage 5.
What is the difference between Paperless-ai and Paperless-gpt?
Paperless-ai is a community plugin that uses a local LLM to suggest tags, correspondents, and document types based on document content. Paperless-gpt is a separate project that uses OpenAI-compatible APIs for the same job. Both are optional – Paperless-ngx ships with native auto-tagging via the Auto matching algorithm that requires no external service.
What documents can Paperless-ngx handle?
Paperless-ngx handles PDFs, images (PNG, JPG, TIFF), and plain text files. It performs OCR on scanned documents, extracts metadata from native PDFs, parses dates and amounts from common invoice formats, and stores files in a structured archive organized by your Jinja2 storage path templates.
What is the ASN field in Paperless-ngx?
ASN stands for Archive Serial Number. Paperless-ngx assigns each document a sequential ASN as it is added to the archive. The ASN appears in URLs, filenames, and search results, providing a stable identifier that does not change even if you rename or retag the document later.
How many documents do I need before the Auto classifier becomes accurate?
Paperless-ngx requires at least 10 manually tagged documents per tag before the Auto classifier can train, but in practice 15-20 per tag produces noticeably better accuracy. Tagged documents must also be moved out of the inbox – the classifier excludes inbox documents from training because they are considered unconfirmed.
Final Thoughts on Paperless-ngx Auto Tagging Rules
Reliable Paperless-ngx auto tagging rules come down to three habits: match the trigger to the data you need (Document Added for OCR text), train the Auto classifier with clean data outside the inbox, and order rules from specific to general. When your rules stop firing on new uploads, walk the seven-step troubleshooting checklist before rebuilding anything – nine times out of ten the bug is a wrong trigger or an inbox-blocked classifier, not the rule itself.
If you take one thing from this guide, take this: drop a fresh PDF into the consume folder after every rule change, watch the logs, and confirm the tag landed before assuming the rule works. That single habit will save you more debugging time than any tool I have found.