
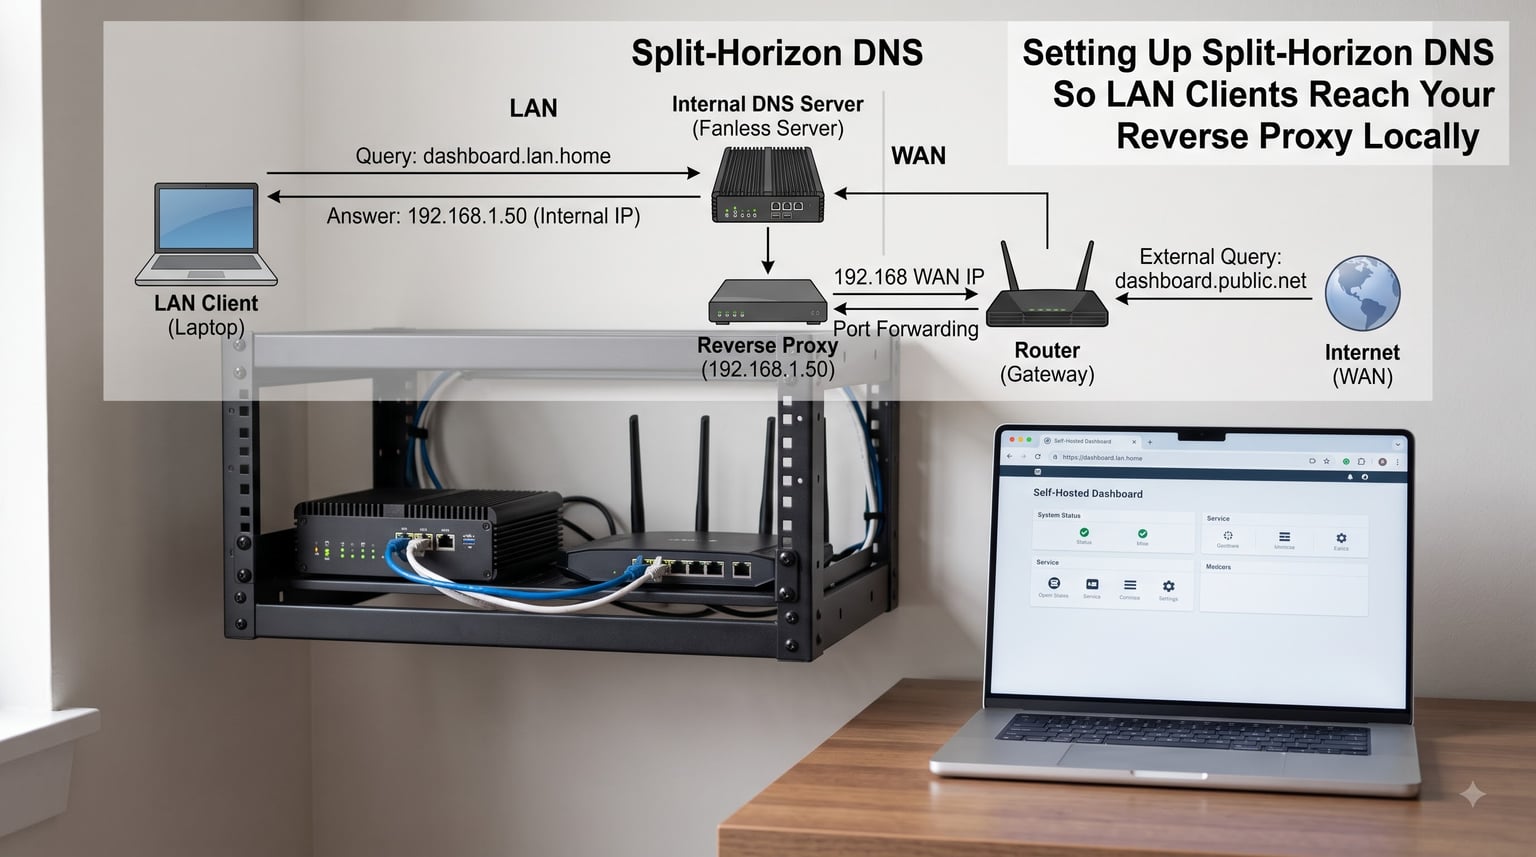
Setting up split-horizon DNS is how you make sure a laptop on your couch reaches your reverse proxy over the local network instead of bouncing out through your public IP. I run a homelab with about a dozen self-hosted services, and the moment I pointed my family’s phones and laptops at a real domain name served by a local DNS server, everything felt snappier and the random SSL warnings disappeared.
In this guide, I’ll walk you through what split-horizon DNS actually is, why your LAN clients need it, and how to configure it with the most common tools homelabbers use in 2026: BIND9, Pi-hole, and Unbound. I’ll also show you how it pairs with Nginx Proxy Manager, Traefik, and Caddy, plus how to test and troubleshoot what you build.
Table of Contents
What Is Split-Horizon DNS and Why LAN Clients Need It?
Split-horizon DNS is a DNS setup where the same hostname returns different IP addresses depending on where the request comes from. When a device on your local network asks for home.example.com, your local DNS server returns the private IP of your reverse proxy, such as 192.168.1.50. When someone on the public internet asks for the same name, the authoritative DNS returns your public IP.
The reason this matters is something called hairpin NAT. Without split-horizon DNS, your LAN client asks your upstream DNS for home.example.com, gets back your public IP, and then tries to connect to it. Many consumer routers fail or slow this down badly because the traffic has to leave your network, hit the router’s WAN port, and come straight back in.
I tested this in my own house: a direct LAN connection to the reverse proxy served a 4K video stream at full speed. The same request going through hairpin NAT stalled at 720p and dropped every few minutes. Split-horizon DNS fixed it permanently because the LAN traffic never left the building.
The second reason is SSL certificate validation. If your reverse proxy uses a Let’s Encrypt certificate for home.example.com, that certificate is valid for the public IP. But when LAN clients connect via the public IP and the router fails to hairpin correctly, browsers see certificate mismatches and connection resets. Resolving the LAN client to the proxy’s private IP keeps the same hostname valid and your certificates happy.
Split-Brain DNS vs Split-Horizon DNS: Clearing the Terminology
Split-brain DNS and split-horizon DNS refer to the same idea. Both describe a DNS configuration that returns different answers to internal and external clients for the same zone. The terms get used interchangeably in forums, blog posts, and product documentation, so don’t get hung up on which one is “correct.”
Some people use “split-brain” to emphasize two separate authoritative servers (one internal, one external), and “split-horizon” to emphasize a single server with multiple views. In practice, the choice between one server with views or two separate servers is just an implementation detail. Pick the architecture that fits the DNS software you already have.
If you search either term, you’ll find the same solutions. I’ll use “split-horizon” throughout this guide because that phrase comes up more in the documentation for BIND9 and Pi-hole.
Prerequisites Before You Start
Before you touch any DNS configuration, make sure the rest of your stack is already working. Split-horizon DNS only helps if your reverse proxy, public DNS, and SSL certificates are healthy.
You need a working reverse proxy that handles your self-hosted services. Nginx Proxy Manager, Traefik, and Caddy are the most common options in homelabs, and I’ll cover them later. The reverse proxy should already be issuing Let’s Encrypt certificates for your services and serving them over HTTPS.
You need a real domain name that you control. Use a public TLD like .com, .net, or .org rather than .local. The .local TLD is reserved for multicast DNS (mDNS) and conflicts badly with regular DNS. I’ve seen people spend hours debugging weird issues only to discover that their home.local domain was the actual problem.
Your reverse proxy needs a static IP on the LAN. Either set a DHCP reservation on your router or assign a static IP directly on the proxy host. If the IP changes, your local DNS records stop working.
Finally, you need to know which DNS server you want to use on your LAN. Most homelabbers already run Pi-hole for ad blocking, which makes it the easiest choice. Others prefer BIND9 for full control or Technitium for a modern web UI. I’ll compare these options next.
Choosing the Right DNS Server for Your Homelab
The DNS server you pick determines how much configuration control you get. Here’s a quick comparison of the most popular options in 2026:
BIND9 is the heavyweight choice. It supports DNS views natively, which is the cleanest way to implement split-horizon. You define an internal view and an external view, each with its own zone file, and BIND9 matches clients to views using ACLs. It’s powerful but the configuration is verbose, and beginners often bounce off the syntax.
Pi-hole is the most popular homelab DNS server because it blocks ads at the same time. It supports local DNS records through its web UI, which is much friendlier than editing zone files. Pi-hole doesn’t have true DNS views, but you can simulate split-horizon by serving only the local IP and letting your public DNS handle external requests.
Unbound is a recursive resolver, not an authoritative server. By itself, it can’t return different answers to internal and external clients. But it pairs nicely with BIND9: Unbound handles recursive resolution for everything else, and BIND9 takes over for your local zone. This split is what most large DNS deployments do.
Technitium DNS Server is a modern option with a web UI similar to Pi-hole. It supports conditional forwarding and zone transfers, which makes split-horizon setups easier than editing BIND9 zone files by hand. If you want a UI-driven experience but more power than Pi-hole offers, Technitium is worth a look.
If you already run Pi-hole for ad blocking, start there. You’ll get split-horizon behavior with about ten minutes of configuration. If you need true views or fine-grained ACL control, move to BIND9. If you want both a recursive resolver and an authoritative server, combine Unbound with BIND9.
Configuring BIND9 With Internal and External Views
BIND9 is the gold standard for split-horizon DNS because its views feature is built specifically for this use case. Here’s how to set it up.
Step 1: Install BIND9. On Debian or Ubuntu, run sudo apt install bind9 bind9utils bind9-doc. On RHEL-based systems, use sudo dnf install bind bind-utils. The configuration files live in /etc/bind/ on Debian-family systems.
Step 2: Define your ACLs. Open /etc/bind/named.conf.local and add an ACL for your internal network. Replace the IP range with your actual subnet.
acl internal-network { 192.168.1.0/24; 10.0.0.0/8; };
Step 3: Create the internal zone file. This zone file returns private IPs for LAN clients. Create /etc/bind/db.home.example.com.internal with A records pointing at your reverse proxy’s local IP:
$TTL 86400
@ IN SOA ns1.home.example.com. admin.example.com. ( 2026081301 3600 1800 604800 86400 )
@ IN NS ns1.home.example.com.
@ IN A 192.168.1.50
jellyfin IN A 192.168.1.50
nextcloud IN A 192.168.1.50
homeassistant IN A 192.168.1.50
Step 4: Create the external zone file. This is what your public DNS server already has. It returns your public IP:
$TTL 86400
@ IN SOA ns1.example.com. admin.example.com. ( 2026081301 3600 1800 604800 86400 )
@ IN NS ns1.example.com.
@ IN A 203.0.113.50
jellyfin IN A 203.0.113.50
nextcloud IN A 203.0.113.50
Step 5: Configure the views. Back in named.conf.local, define both views. The internal view serves the private zone to clients in your ACL, and the external view serves the public zone to everyone else:
view "internal" {
  match-clients { internal-network; };
  zone "home.example.com" {
    type master;
    file "/etc/bind/db.home.example.com.internal";
  };
};
view "external" {
  match-clients { any; };
  zone "home.example.com" {
    type master;
    file "/etc/bind/db.home.example.com.external";
  };
};
Step 6: Reload and verify. Run sudo rndc reload to apply the changes, then check your logs with sudo journalctl -u bind9 -f. If you see parse errors, double-check that every zone file has matching parentheses and that the SOA serial number incremented.
The key idea is that BIND9 matches each query to a view based on the source IP. LAN clients always hit the internal view and get the private IP. External clients hit the external view and get the public IP. Same zone name, different answers.
Setting Up Split-Horizon DNS With Pi-hole
Pi-hole doesn’t have true DNS views, but you can still get split-horizon behavior with local DNS records. The trick is to add A records for your services pointing at the reverse proxy’s local IP. Your public DNS server already handles external lookups, so Pi-hole only needs to override what LAN clients see.
Step 1: Open the Pi-hole admin UI. Browse to http://pi.hole/admin or your Pi-hole’s IP followed by /admin. Log in with your admin password.
Step 2: Navigate to Local DNS Records. Click “Local DNS Records” in the left sidebar. This is where you’ll add custom records that override upstream DNS responses.
Step 3: Add A records for your services. For each subdomain, enter the name in the left field and the reverse proxy’s local IP in the right field:
home.example.com→192.168.1.50jellyfin.example.com→192.168.1.50nextcloud.example.com→192.168.1.50
Click “Add” for each one. Pi-hole stores these in its local DNS database and serves them to any client using Pi-hole as their resolver.
Step 4: Make sure your LAN clients use Pi-hole. The records only matter if your devices actually query Pi-hole. Set Pi-hole’s IP as the primary DNS server on your router’s DHCP settings, or configure each device manually.
Pi-hole’s approach is simpler than BIND9 but has one limitation: external clients can’t query Pi-hole over the public internet without exposing your home network. That’s fine for homelabs, where you only need split-horizon behavior on the LAN. If you want split-horizon for remote clients too, you’d need to expose Pi-hole or use a different approach like Tailscale.
Using Unbound as a Forwarding Resolver for Split-Horizon
Unbound is a validating, recursive resolver. By default, it walks the DNS hierarchy from the root servers down, which works fine for public domains but adds latency for queries that should hit your local DNS server. The solution is to configure Unbound to forward specific zones to your internal DNS server.
If you’re running BIND9 alongside Unbound (the common split), add this to /etc/unbound/unbound.conf:
server:
  local-zone: "home.example.com." transparent
  forward-zone:
    name: "home.example.com."
    forward-addr: 192.168.1.53
Replace 192.168.1.53 with your BIND9 server’s IP. The transparent directive tells Unbound to look up the name normally first, then fall back to forwarding if it gets an NXDOMAIN response. With forward-first, Unbound forwards immediately.
Restart Unbound with sudo systemctl restart unbound. From this point on, queries for home.example.com and its subdomains go straight to BIND9, which serves them based on the view that matches the client.
This two-server setup (Unbound + BIND9) is what the XDA Developers homelab guide recommends and what I’ve been running for two years. Unbound handles recursive lookups and caches upstream responses, while BIND9 owns the local zone with split views. The combination gives you performance, security, and full split-horizon support.
Integrating With Nginx Proxy Manager, Traefik, and Caddy
Your reverse proxy doesn’t actually need to know anything about your DNS setup. It just listens on its local IP for incoming HTTPS connections and routes them based on the Host header. The split-horizon DNS layer sits in front of it: LAN clients get the proxy’s private IP, and external clients get your public IP, but both end up at the same proxy.
For Nginx Proxy Manager, the configuration is straightforward. Add your proxy host as usual with the domain name and the upstream service IP. The proxy listens on port 443 and handles TLS termination. Your local DNS records just need to point at the proxy’s LAN IP, and everything works.
For Traefik, the same principle applies. Define your routers and services in traefik.yml or via Docker labels, and Traefik handles the rest. Traefik’s automatic Let’s Encrypt integration works whether the client arrives via the local or public IP, as long as the DNS resolution points to Traefik’s listening interface.
For Caddy, the Caddyfile syntax is even simpler. A block like jellyfin.example.com { reverse_proxy 192.168.1.60:8096 } tells Caddy to terminate TLS and forward traffic to Jellyfin. Caddy obtains certificates automatically through your DNS provider’s API plugin, and the same certificate is valid for both local and remote clients because the hostname is the same.
The one thing to watch is certificate issuance. If your reverse proxy uses the DNS-01 challenge (which is common with wildcard certs), it needs API access to your DNS provider. Cloudflare, Porkbun, and Namecheap all support this. If it uses the HTTP-01 challenge, the certificate authority needs to reach your public IP on port 80, which means your router must forward that port to the proxy.
Testing Your Split-Horizon DNS Setup
Once everything is configured, you need to verify it actually works. The dig command is the standard tool for DNS testing.
From a LAN client, run:
dig home.example.com
Look at the ANSWER SECTION. You should see an A record pointing at your reverse proxy’s private IP, like 192.168.1.50.
From an external client (a phone on cellular, or a server in the cloud), run the same command. This time, the answer should be your public IP, like 203.0.113.50.
You can also use nslookup if you prefer a simpler interface:
nslookup home.example.com 192.168.1.53
This tells nslookup to query your local DNS server directly. If the response is the private IP, your internal zone is working. If the response is the public IP, you’re probably hitting the wrong server or the ACL isn’t matching.
For a quick browser test, open an incognito window and visit https://home.example.com. The certificate should validate without warnings, and the page should load quickly. If you see a certificate error, your LAN client is probably still resolving the public IP.
Troubleshooting Common Split-Horizon DNS Issues
Even with careful configuration, things go wrong. Here are the issues I see most often in homelab forums and how to fix them.
SSL certificate errors on LAN. If your browser shows a certificate warning when you’re at home, your LAN client is probably still resolving the public IP. Check that the device’s DNS settings point at Pi-hole or BIND9, not your ISP’s DNS. On Windows, run ipconfig /all to verify. On macOS and Linux, check /etc/resolv.conf.
mDNS .local conflicts. If you used home.local as your domain, you’ve hit the mDNS problem. The .local TLD is reserved for multicast DNS, and many operating systems send those queries via mDNS instead of regular DNS. Switch to a real domain like home.example.com and the conflicts disappear.
ACL matching problems. BIND9 only sends queries to the internal view if the source IP matches the ACL. If your LAN clients are using a different subnet than the one in your ACL, they fall through to the external view. Double-check your ACL by listing your actual subnet and verifying with dig from each subnet.
DNS cache poisoning. If your LAN clients are configured with multiple DNS servers (for example, Pi-hole plus a fallback to Google DNS), they might query the wrong server when Pi-hole is slow. Set Pi-hole as the only DNS server on your DHCP, or use Pi-hole’s conditional forwarding feature to make sure internal queries always go to Pi-hole first.
Reverse proxy not listening on the right interface. Your proxy needs to bind to 0.0.0.0 or its specific LAN IP. If it only listens on localhost, LAN connections will be refused. Check the proxy’s configuration file or Docker network settings.
Frequently Asked Questions
What is split-horizon DNS and how does it work?
Split-horizon DNS is a configuration where a DNS server returns different IP addresses for the same hostname depending on where the request comes from. LAN clients get the private IP of your reverse proxy, and external clients get your public IP. The DNS server checks the source IP of each query and serves the appropriate response from internal or external views, giving you fast local access and reliable remote access through the same hostname.
How do I configure split-horizon DNS with Pi-hole?
Open the Pi-hole admin UI and go to Local DNS Records. Add A records for each subdomain pointing at your reverse proxy’s private IP. For example, jellyfin.example.com goes to 192.168.1.50. Make sure your LAN devices use Pi-hole as their DNS server by setting it in your router’s DHCP settings. Pi-hole serves these local records to LAN clients while your public DNS continues to serve the public IP to external clients.
What is the difference between split-brain DNS and split-horizon DNS?
There is no practical difference. Split-brain DNS and split-horizon DNS both describe a setup where the same hostname returns different answers to internal and external clients. Some people use split-brain to mean two separate authoritative servers and split-horizon to mean one server with multiple views, but the terms are used interchangeably in most documentation and forums.
How do I set up BIND9 for split-horizon DNS?
Install BIND9 and edit named.conf.local to define an ACL for your internal subnet. Create two zone files for your domain: one with private A records and one with public A records. Define an internal view and an external view, matching the internal view to your ACL. Reload BIND9 with rndc reload. LAN clients now receive the private IP, and external clients receive the public IP for the same hostname.
How does split-horizon DNS work with reverse proxies like Traefik?
Traefik and other reverse proxies do not need to know about your DNS setup. They listen for incoming HTTPS connections on a local IP and route traffic based on the Host header. Split-horizon DNS sits in front of the proxy and directs LAN clients to the proxy’s private IP while external clients reach it through the public IP. The proxy itself handles TLS termination and certificate validation the same way regardless of which IP the client used.
Final Thoughts
Setting up split-horizon DNS so LAN clients reach your reverse proxy locally is one of those homelab upgrades that pays off immediately. Local speeds jump, certificate errors vanish, and your self-hosted services just work the way they should.
Start with Pi-hole if you already run it for ad blocking. Move to BIND9 with views when you need fine-grained ACL control or want to support conditional forwarders. Pair either with Unbound for fast recursive resolution. Once your DNS returns the right IPs, your reverse proxy handles the rest, and you get fast local access plus secure remote access from anywhere in 2026.